Wednesday, April 15, 2015

Wildflowers and Butterflies: Time to be Brave in New York

This past week I got to go to New York with my daughter and the Port Angeles High School Choir.  Wow!  What a crazy and action packed trip it was!  I made this card before leaving as I was thinking about being brave while in the huge city of 8.5 million people.  Nature was one thing I did not see much of.  No butterflies for sure.  However there were some beautiful flower arrangements which I took photos of and will share in a later post with some other New York photos.


For this card I made the butterflies out of painted canvas which I adhered to card stock.  I used Anna-Karin's technique which she shared in this post.  Her blog is called Layers of Ink.  I had fun incorporating the Tim Holtz Idea-ology clock hands and the metal ornate plate into this card.  I also used the Trellis Frameworks die from Tim Holtz Alterations Collection.  At the top and bottom of this card I stuck down some washi tape and over that I laid down a sticker strip from Tim Holtz Gallery Industrious Stickers from his Idea-ology Collection.

Here are a few close-ups:


Thanks for stopping by!

Thursday, April 2, 2015

Fun With Polymer Clay and Pearly Powders

Hello!  I recently stumbled on some beautiful pieces made out of polymer clay and Pearl Ex or Perfect Pearls powders.   A woman named Sara has a few great videos on YouTube.  Here's a link to a video where she does a sort of show and tell.  It's called Clay Tile Share.  She also has Clay Art Tile Tutorial Part 1 and Part 2 videos.  In her videos she speaks about being very inspired by the work of Gabrielle Pollacco and Chris Kapono.  Gabrielle has a blog with beautiful scrapbook pages, polymer clay projects and more.  Here'e a link to her blog.

So . . . as you might have guessed I had to pull out my polymer clay and give this a try.  My pieces are very simple and I really can't wait to do more.  But here are some photos of my first attempts to use stamps, metal beads and glass beads with polymer clay.

Here they are fresh out of the oven!  I baked them on an index card placed on a cookie sheet.
The Pearl Ex powders create such a beautiful look!   Below you can see that I added a little butterfly I had and put this on a chain.
Here are two different photos of the earrings.  Simply pushing a flower spacer bead into the center of these pieces add a nice touch.

I am just starting to get a glimpse of how much fun can be had working with polymer clay!  Time to go play some more!  Thanks for stopping by!

Monday, March 30, 2015

A Parade of Butterflies!

This piece started with a desire to incorporate some fabric into a mixed media piece.  I created this by starting in the center and working my way out.   The green, pink and yellow pieces behind the center heart are fabric.  Both above and below the fabric are some pieces of ribbon.  The ribbon and the fabric were 'collage pauged' to a piece of dictionary paper which I gelli printed a few weeks ago.

Before I added the butterflies I put this under my sewing machine and stitched with some yellow thread.  The paper behind the heart is a torn scrap of gelli printed deli paper.  I decided to frame what I had so far with some coordinating washi tape and then added the layered butterflies.  The butterflies were cut using a combination of Sizzix dies and paper punches.
 I think it could be fun to add a little jewel to the center of each butterfly.  Or maybe some Liquid Pearls dots.
Thanks for visiting!

Friday, March 27, 2015

A Birthday Card With a Large Foil Flower

Both of my daughters have birthdays in April!  So I figured I'd better get to work on their birthday cards.   I bought some Heidi Swapp flowers and this beautiful mint colored foil at my local Joann's.  I did not buy the Heidi Swapp Minc Foil applicator machine because it was $150!!  However, a month or so ago I bought a small $20 laminator that Jennifer McGuire recommended in this post.  Guess what?!  Heidi Swapp's flowers and foil worked in my little inexpensive laminator!  I was so excited!  This is the package of flowers that I bought.  They are card stock with black toner (I assume) and when you run it through a laminator the foil adheres to the black areas.  Very cool!
The package of Tim Holtz Idea-ology metal plaquettes happened to have the number 17 and the number 14.  Perfect!  A card for my almost 14 year old is next on my list.  I also loved the opportunity to use my new Make A Wish candles die set from Memory Box.  These candles come in sets of 3 in three different sizes.

Here's a close-up of the foiled mint flowers that I layered to create one large flower.
Thanks for stopping by.  Have a great weekend!!

Wednesday, March 25, 2015

Remnant Rub Butterfly Tag


I recently stumbled upon the Compendium of Curiosities Challenge #24.  You can read about how it works here.  Basically, every two weeks a new technique is chosen from Tim Holtz's A Compendium of Curiosities, Volume III book.  Then anyone interested can refer to that technique in their book (you have to have your own copy of the book - their are no instructions included) and create something using that technique.  There were tons of great photos of tags and other art that the Curiosity Crew had created and I learned of quite a few new blogs I will be following. You can read about the CC3 Challenge 24 here and see some of the fantastic remnant rub projects.  So, being the little eager beaver that I am, I ran (okay drove) to Doodlebugs in Sequim to grab a copy of the third volume of 
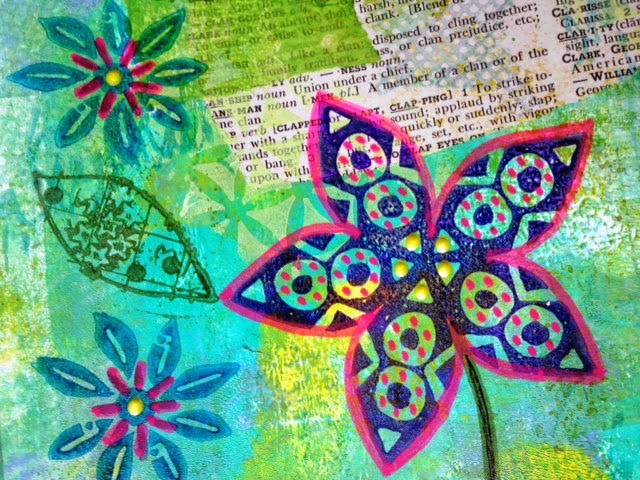
A Compendium of Curiosities.   Here is the tag I created with the Remnant Rub technique on page 51.

Here is what the tag looked like after I used the remnant rub technique and before I started embellishing it:

I really like this technique!! I especially like the white showing through.  Here are some more photos including a few close-ups:


A big thank you to the folks at The Funkie Junkie Boutique for sponsoring this challenge!  

Thanks for visiting!  Have a great day!

Monday, March 23, 2015

Art Journal Spread With Julie Balzer Stamps

Julie Balzer's new hand carved leaves and hand carved flowers stamps were fresh in my hands when I created this layout in my large art journal.  It's definitely green and spring-like.  I really love the addition of the little yellow Perfect Pearls dots that I added to the center of the flowers.  It's always exciting to me how just adding a few little details here and there can bring a page together.  
There are also a few things that bug me about this page . . . the middle flower is a little too tall and I wish I would have included a poem or message of some sort in the space to the right of the flower on the left page.  I guess I could still go back in and add a poem or quote.  It's kind of fun to be able to go back and add to pages days, weeks or even months later.

Below you'll find a few close-ups of this spread.


Thanks for visiting!!

Friday, March 20, 2015

Red and Orange Background With Alcohol Ink

This month at Doodlebugs, my local paper crafting store in Sequim, WA, the product challenge is to use alcohol ink.  I don't think I've used alcohol inks in my art journals so this was a new experience.  I   wanted to give it a try.  I applied a matte medium to the background and let it dry before starting in with the alcohol inks.  I used the felt applicator and squirted/dripped drops of alcohol ink onto the applicator before brushing the ink onto my art journal.  Next I used some modeling paste through a stencil to create the vine like look.  When the modeling paste was dry I put the stencil back down and applied some green paint.  The circles were cut out of some gelli printed deli paper.  I also got to use one of my new Dina Wakley stamps from her Scribbly Flowers set.

These aren't my usual colors but they're warm and bright with a tad bit of my favorite green.   The quote is a reminder to myself that often good things (perhaps growth and wisdom) come from disagreements.  And that conflict is a part of life . . . not something to be feared and avoided.  I can always use some enlightenment!

Have a great weekend!